When creating an application installer, sometimes we need to add some files to be included in the package. For e.g. database file, report file, image file, ect. I've made a post about how to create installer on this link (It was using VS 2015):
https://rani-irsan.blogspot.com/2021/10/vbnet-creating-installer-package-with.html
For now, I'm gonna show you how to add files into installer and I'll use VS 2019 Community Edition.
I have a project named Practice to be used as a sample. I'll collect files to inculde in a folder to make it tidier. So, let's create a new folder first on Solution Explorer under Practice project. Right click Add -> New Folder.
Open file explorer and place files to be included in "files" folder that we've just made.
Back to the Visual Studio, let's include those files into the project by right clicking --> Add -> Existing Item....
Go to the "files" path then select "All Files" combo to display all existing files. Choose the files that we want to add then click Add button.
The files already included in Solution Explorer.
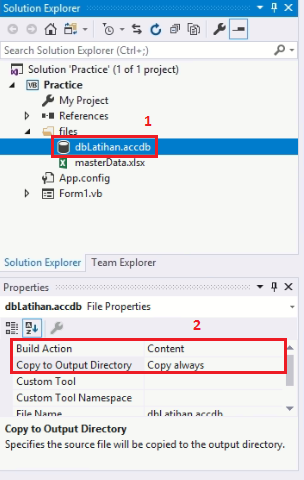
Next step is setting files properties. Select the file so its properties is displayed then set Build Action = Content, and Copy to Output Directory = Copy always. Do it for each files that we want to be added to installer.
Now, let's check if the files has already included as application files. Open project properties as below.
Choose Publish on the left panel then click Application Files... button.
We can see dbLatihan.accdb and masterData.xlsx has already existed in Application Files.
Installer is created on its default path.


0 Comments