
- How to connect VB.NET to MySQL database
- How to binding MySQL data to DataGridView
- How to binding MySQL data to ComboBox List
Next, I'm going to give you a Step by Step Tutorial on how to Create (add new data), Read, Update, Delete.
I use table named "class" which has structure and values as below:

First, we need to prepare buttons that used to Save, Edit, Delete, Cancel, and Exit.
I'm going to create the buttons using ToolStrip Control.

Further about create and work with ToolStrip Control, read also this article:
For inputting data, add labels and textboxes as below.
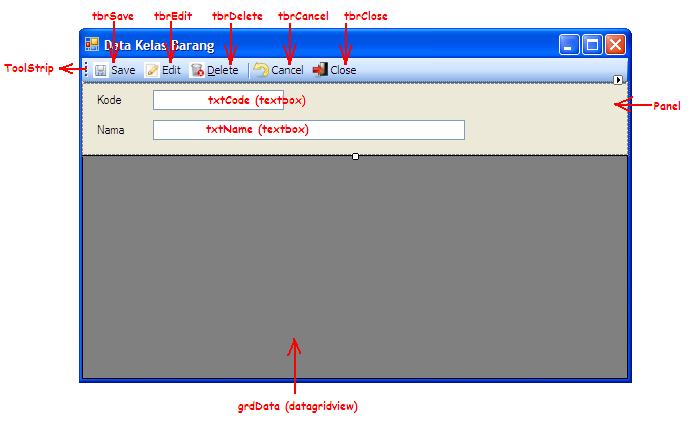
Add a panel as container of those labels and textboxes for inputting data, then set property Dock = Top. Finally, add datagridview and set the property of datagridview Dock = Fill. Name control as above image.
Done with UI, let's start with code behind. Import MySqlClient and System.Data:
Imports MySql.Data.MySqlClient
Imports System.Data
Declare an object connection and a string variable for query. I name the form with frmClass.
Public Class frmClass
Dim conn As MySqlConnection
Dim SQL As String
End Class
Create a sub procedure named Data_Load to display data into datagridview. Make sure to place this procedure under frmClass class. I add syntax of Try Catch as error handling.
Sub Data_Load()
Dim myCommand As New MySqlCommand
Dim myAdapter As New MySqlDataAdapter
Dim myData As New DataTable
conn = New MySqlConnection()
conn.ConnectionString = "server=localhost;user id=root;" & _
"password=;database=datapos"
Try
If conn.State = ConnectionState.Closed Then conn.Open()
SQL = "Select classcode, classname From class"
myCommand.Connection = conn
myCommand.CommandText = SQL
myAdapter.SelectCommand = myCommand
myAdapter.Fill(myData)
With grdData
.DataSource = myData
.AllowUserToAddRows = False
.AllowUserToDeleteRows = False
.ReadOnly = True
.Columns(0).HeaderText = "Kode Kelas"
.Columns(1).HeaderText = "Nama Kelas"
.Columns(0).Width = 100
.Columns(1).Width = 250
End With
conn.Close()
Catch myerror As MySqlException
MessageBox.Show("Error: " & myerror.Message)
Finally
conn.Dispose()
End Try
End Sub
Execute the procedure under Form_Load event .
Private Sub frmClass_Load(ByVal sender As Object, _
ByVal e As System.EventArgs) Handles Me.Load
Data_Load()
End Sub
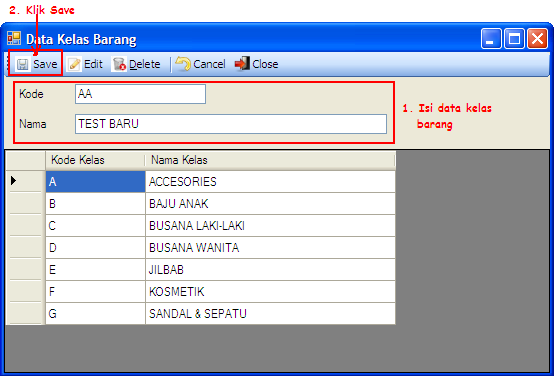
Keep going...., we'll create a procedure to add new data. Users will input code and name into textboxes, then click Save button for saving new data into the database. Codes that need to be added under tbrSave_Click event are as following:
Private Sub tbrSave_Click(ByVal sender As System.Object, _
ByVal e As System.EventArgs) Handles tbrSave.Click
Dim myCommand As New MySqlCommand
conn = New MySqlConnection()
conn.ConnectionString = "server=localhost;user id=root;" & _
"password=;database=datapos"
Try
conn.Open()
SQL = "INSERT INTO class (classcode, classname) VALUES " & _
"('" & txtCode.Text & "', '" & txtName.Text & "')"
myCommand.Connection = conn
myCommand.CommandText = SQL
myCommand.ExecuteNonQuery()
MsgBox("Data baru tersimpan")
txtCode.Text = String.Empty
txtName.Text = String.Empty
Data_Load()
conn.Close()
Catch myerror As MySqlException
MessageBox.Show("Error: " & myerror.Message)
Finally
conn.Dispose()
End Try
End Sub
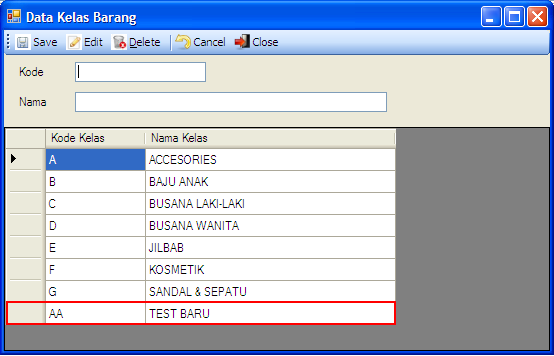
A message box is added after inserting data as an alert that data adding has already been succeeded. Data_Load procedure is called again after, for displaying the newest update.
Let run the app then try to add a new data.

This tutorial also available @youtube:


 - Part 1)
0 Comments